cooks feature
DUTCH TREAT
Creating amazing outdoor meals the old-fashioned way.
WRITTEN BY BARBARA TWITCHELL
PHOTO BY AMANDA TWITCHELL
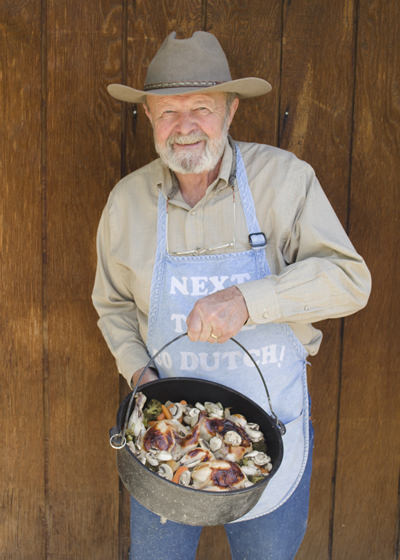
When Dennis Golden suggests going Dutch, he’s not really looking for a cheap date. He’s inviting you to enjoy one of the oldest and most enduring forms of cooking: Dutch oven.
The longtime Reno resident is well known in the community as a cowboy poet, the host and producer of several award-winning PBS-TV series, and, yes, a Dutch oven master chef. In fact, two of his recipes appear in the recently published Lodge Cast Iron Nation: Great American Cooking from Coast to Coast cookbook.
Golden was first exposed to Dutch oven cooking in childhood but didn’t develop his passion for it until about 20 years later. On a hunting trip, he tasted fresh-baked, Dutch oven bread made by a Basque sheepherder. That was it. He was addicted.
One Versatile Vessel
Fresh-baked bread in the middle of the wilderness? That’s the beauty of the Dutch oven, according to Golden.
“Anything you can cook in your oven at home, you can cook in here,” he says. “It’s basically just an oven.”
Actually, it’s more than that. This versatile pot, which has been around for more than 300 years, can be used for roasting, baking, boiling, stewing, frying — you name it, and this single pot can do it all. And it can do it just about anywhere.
Imagine how dramatically such a cooking utensil could expand the culinary options on your next camping trip. Stews, breads, puddings, cobblers … they’re all possible, even for a beginner, according to Golden. The key is to start with the right equipment (see sidebar).
Hints From the Master
Most importantly, invest in a traditional cast iron Dutch oven, which, according to Golden, has three legs that extend below the oven so it can sit over hot coals. It also has a recessed lid with a lip around the edge to retain the hot coals, allowing them to also heat the oven from the top.
Use charcoal briquettes. They simplify the process. Temperature is regulated by the number of briquettes placed under and over the oven. Don’t let this scare you. Most Dutch oven recipes will give specific guidelines for that.
Golden recommends using a chimney to heat the briquettes and advises that you heat more than you think you will need, just in case you have to replace some that burn out too quickly.
However, he warns, do exercise restraint.
“People have a hard time believing if you say just put six coals underneath there that it’s gonna cook,” Golden says. “Don’t add a bunch more. You can burn it. If you put too few, you can just cook a little longer. Put too many — you’ll be opening a can of beans for dinner instead.”
No need to worry about having to perform the traditional ritual of seasoning a new cast iron pot before use (a process which renders it stick resistant by applying oil and exposing it to an extended period of heat). Nowadays, Golden says, most are sold already seasoned.
For care and cleaning, less is more. Just scrape out any remaining food, rub with a nonmetallic scrubber if needed, rinse with plain water, and dry thoroughly. Rub the pot with a light coating of oil and store with a paper towel inside to absorb any moisture.
Lastly, he advises, “Just buy a book, try some recipes. There are so many Dutch oven cookbooks out there now, and these recipes are amazingly forgiving.”
And we shouldn’t forget to mention, amazingly good!
Reno-based freelance writer Barbara Twitchell shamelessly savored the delicious Cornish game hens Dennis Golden prepared during this interview. She vows there’ll be a Dutch oven included in her camping gear in the future!
Everything You Need to be a Dutch Diva (or Dude)
• Dutch oven pot with feet and recessed lid
• Chimney to heat charcoal briquettes
• Good quality charcoal briquettes
• Metal cooking table or large, flat metal tray to provide a stable, heat-tolerant cooking surface. A cookie sheet, roasting pan, or sheet of aluminum foil will suffice. (Suggested, not necessary. You can cook on the dirt if you wish.)
• Gloves that are heat and flame resistant
• A trivet to set the Dutch oven on after removing it from hot coals (you can use rocks)
• A lid lifter — there are several different kinds
• A nonmetallic scouring pad
Dutch Oven Recipes
Dutch Oven Cornish Game Hens
(courtesy of Dennis Golden. Serves 4 to 6, one hen per person)
Dennis Golden uses his Dutch oven for camping, but also regularly makes wonderful meals with it in his backyard. Because charcoal briquettes are the heat source, a Dutch oven is convenient to use in either environment.
4 to 6 Cornish game hens
Garlic salt, to taste
Pepper, to taste
1 to 2 each apples, onions, and stalks of celery (cut into small pieces to stuff in birds)
Fresh or frozen vegetables of your choice (i.e. small potatoes, yellow onions, carrots, broccoli, cauliflower, mushrooms, etc.), cut into small pieces
¼ cup warm water
Corn syrup glaze (see recipe, below)
Corn Syrup Glaze
1/3 cup vegetable oil
1/3 cup chicken broth (canned or reconstituted bouillon)
1/3 cup light corn syrup
Note: Start with frozen game hens. Let them thaw slowly in an insulated camp cooler. Best as a second or third night camp meal.
Prepare and light 30 to 40 charcoal briquettes.
While they are heating, wash and generously season game hens inside and out with garlic salt and pepper. Stuff with pieces of apple, onion, and celery. Place 4 stuffed hens on a wire rack (canning lid rings also will work) in a 12-inch Dutch oven (6 birds will fit in a 14-inch Dutch oven). Mix together corn syrup glaze ingredients and brush over birds. Add vegetables of choice around game hens. Pour in ¼ cup of warm water.
Place a single layer of about 15 hot coals on cooking surface. Place Dutch oven over coals and cook bottom for 20 to 25 minutes. Put 14 to 16 additional coals on lid and continue cooking 40 to 45 minutes. If hens are cooking too quickly (they will pop and hiss loudly) remove half of both top and bottom coals. If browning too much, remove top coals only.
Remove lid two to three times and baste hens with syrup glaze. When vegetables are soft, hens’ juices run clear, and leg joints move easily, dinner is ready.
Easy Dutch Oven Beer Bread
(courtesy of Dennis Golden)
Few ingredients and easy prep make this tasty bread a great campsite option.
2 cups self-rising flour
2 to 3 teaspoons sugar or honey
1 teaspoon salt
9 to 10 ounces warm beer
Butter
Heat about 20 to 30 charcoal briquettes.
Mix all ingredients together, adding the beer in stages, a little at a time. Pour into oiled Dutch oven and cover with lid. Put 8 briquettes under the Dutch and 10 briquettes on top of the lid. Cook about 1 hour and 15 minutes. Baste with butter every 20 minutes. Serve warm.
Dutch Oven Cherry Cobbler
(courtesy of Dennis Golden. Serves 8)
“Cobblers are the first things that you should try when learning to cook ‘Dutch,'” Dennis Golden says. “You can make them with just about any canned filling. They are simple, hard to mess up, and always seem to be a hit after a hearty camp meal.”
2 to 3 cans cherry pie filling
3 teaspoons tapioca
½ box yellow cake mix
½ cup crème de cassis-flavored syrup (or any cherry-flavored syrup)
Heat 30 charcoal briquettes.
Line your Dutch oven with a double lining of tin foil. Use a lot of foil to ensure that there are no leaks on the bottom of or inside the oven. Also, make sure that the foil is low enough to allow a good seal for your lid. The double lining will make your oven easier to clean afterwards.
Mix together canned pie filling, tapioca, and ½ cup crème de cassis in Dutch oven. This should fill the Dutch 2 to 3 inches deep. In a separate bowl, add together cake mix and enough water to make the mixture smooth and thick but still pourable. Pour evenly over the cherry pie mixture already in oven. Leave at least 2 inches of space on the inside of the Dutch so the lid won’t be pushed up as the cake rises.
In cooking area, prepare your coals for a medium fire (for a 10-inch Dutch, use 6 to 8 coals on bottom and 8 to 10 coals on top; for a 12-inch Dutch, use 8 to 10 coals on bottom, 10 to 12 coals on top). Place covered Dutch oven on coals and add coals to top. Cook about 30 minutes. Cobbler is done when top is brown and starts to crack or when a toothpick inserted in center comes out clean.
Tangy Dutch Oven Horseradish Venison Roast
(from Lodge Cast Iron Nation: Great American Cooking from Coast to Coast by Lodge Manufacturing Co./Oxmoor House. Serves 6 to 8)
This recipe works great in a 9-quart Dutch oven. It isn’t just the horseradish that contributes to the tangy flavor but also the watercress. Abundant in many small Nevada streams, watercress often is available in specialty markets. This all-in-one meal has been converted by Dennis Golden for indoor cooking from one that originally was buried and cooked all day in camp.
4 to 6 tablespoons olive oil
1 (4-pound) venison shoulder roast, cut to fit Dutch oven
2 cups solidly packed whole tomatoes, peeled and undrained
½ cup dry sherry
1 cup beef broth
1 tablespoon celery seeds
3 tablespoons onion salt
3 tablespoons garlic pepper
6 tablespoons prepared horseradish
1 cup fresh watercress sprigs, chopped
6 small red potatoes, quartered
6 small yellow onions, quartered
4 medium carrots, cut into 1-inch lengths
4 celery ribs, cut into 1-inch lengths
Preheat the oven to 300 degrees F.
Heat the oil in a 9-quart cast iron Dutch oven until a sprinkle of water sizzles when added. Add the roast, and brown on all sides.
While the roast browns, combine the remaining ingredients in a medium bowl. When the roast is browned, pour the mixture all around it in the Dutch oven. Cover and bake on the middle rack in the oven until the roast is fork tender, 3 to 4 hours. Check on it occasionally, and increase or reduce the oven temperature to maintain a simmer.
Slice the meat, and serve with vegetables from the Dutch oven.
Easy Dutch Oven Sourdough Bread
(from Lodge Cast Iron Nation: Great American Cooking from Coast to Coast by Lodge Manufacturing Co./Oxmoor House. Makes one 12-inch loaf. Photo by Helene Dujardin)
This recipe is from Dennis Golden. To make this, you need sourdough starter, which must be started 4 to 5 days ahead of when you want to bake your bread. If you’re in a hurry, you can buy packaged starter at most specialty food or kitchenware stores or online and follow the directions.
Sourdough Starter
2 cups unbleached all-purpose flour
2½ cups warm water (about 110 degrees F)
Sourdough Bread
4 to 6 cups unbleached all-purpose flour
1 (¼-ounce) package active dry yeast (2¼ teaspoons)
¼ cup lukewarm water (about 80 degrees F)
2½ tablespoons corn or canola oil or melted vegetable shortening
2 tablespoons sugar
1½ teaspoons salt
½ teaspoon baking soda
Nonstick cooking spray
Make sourdough starter: Combine the flour and water in a large glass jar or sturdy plastic container with a tight-fitting lid. Cover tightly, and set in a warm (but not hot) place for 4 to 5 days before using.
Make sourdough bread: In a large plastic or glass bowl, mix 1 cup of the sourdough starter with 4 cups of the flour. Stir in as much water as is needed to reach a mixable, semiliquid consistency. Cover and set in a 120 degree F oven until the mixture is active and foamy, 45 to 60 minutes or more. In a small bowl, combine the yeast with the lukewarm water to activate. Stir in the oil, sugar, salt, and baking soda. Stir this into the sourdough mixture once it gets foamy.
Coat the inside of a 12-inch cast iron Dutch oven with cooking spray (including the inside of the lid). Wipe with a paper towel. Set the pot in the oven, and preheat it to 120 degrees F.
While the pot heats, add more flour as needed to the sourdough mixture to form a dough that is stiff enough to turn out onto a floured board. Knead and turn the dough, adding more flour as necessary, until it is stiff enough to form a round loaf and quits sticking to your hands. Don’t over-knead the dough; that can hamper the rising process. Transfer the dough to the prepared and preheated Dutch oven. Gently push the loaf out to the edge of the pot. It should come only halfway up the side of the Dutch oven, or even less. Cover with the lid, and place in the warm oven to rise.
When the dough has risen to nearly the top of the pot (after about 45 minutes), turn the oven temperature to 375 degrees F (yes, the dough is in the oven as it is preheating), and bake until golden brown, about 1 hour and 15 or 20 minutes.
Turn the loaf out onto a board or towel. Let it cool a bit, then slice and enjoy.