Slow Food
Gathering (and eating) garden snails.
Gardens are for gardening, not hunting, right? In both, you are instrumental in procuring your food, and sometimes you set out to do so armed with objects that can be dangerous. But it’s rare to see gardeners get decked out in camouflage to go pick radishes. In fact, hunting can seem pretty far from gardening in the outdoor-activity spectrum. Yet you can indeed be both a hunter and a gardener without traveling any farther than your own planting plot by dining on one of the prevalent pests found there: snails.
This season, it’s payback time. Don’t poison snails for eating your garden greens. Make a free-range dinner out of them instead.
Really, Garden Snails?
Indeed, if you’re curious and adventurous enough, you can make your very own escargot from garden snails. People the world over have done it. Chef Gordon Ramsey has made YouTube videos on it. Certain steps must be taken to turn the pests into a delicacy, however.
Master gardener Michael Janik of Michael’s Apples experimented with making escargot from snails found in his Reno garden. An avid outdoorsman, a curious Janik learned one day that hunter-gatherers also can be hunter-gardeners.
To catch snails, he suggests putting a shallow container into your garden bed, then recessing it until the container top is flush with the soil. Then bait the trap. Beer works well, Janik says.
Check your trap daily and remove snails, placing them in another hard container, perhaps a bucket, that has a cover to prevent escapes — they’re faster than their sluggish reputation lets on — and holes for aeration. Keep your snail farm in a shady spot as they will dry out and cook in heat, and you want the honor of cooking them yourself after going to all this trouble.
Also note that snails can chew through cardboard, so find something sturdy to contain them.
Clean their new home daily; it will get slimy, and the longer you wait to clean it, the more difficult it will be to do so, and you don’t want your upcoming dinner living in slime.
Keep the snails’ environment moist by spritzing them with some water after cleaning their home, but don’t leave standing water in the bottom. If you have ducks or chickens on your property, know they’re also big fans of escargot in the raw and might snack on your snails before you get to them if they’re accessible.
Then you must purge the snails of everything they’ve eaten recently, which could include bait poison. This process will take up to two weeks. Begin by feeding them greens or herbs. After a couple of days, switch to feeding them either cornmeal or carrots, which changes the color of the snails’ excrement to white or orange, respectively, so you can tell when any poisons they may have dined on are out of their system. Do this for several more days to ensure anything unsavory or downright dangerous has been purged.
Then feed them nothing for a day or two, allowing everything to be purged from their systems before you prepare them for dinner.
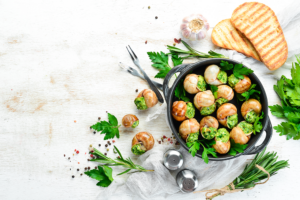
Free-Range, Homemade Escargot
After the purging process is complete, you can refrigerate them or prepare them right away. But first, you must deslime them and separate them from their shells.
Here’s the process used by Molly Watson, a writer with edible Communities:
- Bring a large pot of heavily salted water to a boil.
- Cook the snails for about 3 minutes.
- Drain the snails and rinse them with plenty of cool water.
- Use tweezers or pinchers to pull each snail from its shell.
- Bring a pot with 3 parts water to 1 part distilled white vinegar to a boil.
- Add the snails and cook until the slime is gone, about 3 minutes.
Watson mentions you can skip Step 6, but that will result in slimy, unappetizing snails.
If making classic escargot, clean the shells by bringing about 4 cups of water to a boil then adding 2 tablespoons of baking soda. Drop the snail shells into the pot and boil for about 3 minutes, followed by air-drying the shells or patting them dry delicately, as they can be fragile.
Janik boiled his snails then sautéed them in butter and garlic. He says a friend once told him, “Escargots are a delivery system for butter and garlic on bread.” And that’s just how he prepared them.
It’s quite a process, but farming and eating your own snails can be rewarding.
“They tasted like escargot — lots of butter and garlic and fresh-baked bread,” Janik says. “Only had them once or twice, but if we get a good rain this year…”
Ingredients
- 24 snails deshelled and deslimed
- 24 snail shells optional*
- Rock salt optional
- 1 garlic clove
- 1 shallot
- ½ cup flat-leaf parsley leaves
- ¼ cup butter
- Salt
- Freshly ground black pepper
Instructions
- Heat an oven to 375 degrees F. Drain the snails, if needed. Set the shells in an escargot plate, if you’re lucky enough to own such an item. For the rest of us, set them in a small baking dish or on a rimmed baking sheet. You don’t want it too much bigger than all the shells because you want the melted butter to sort of stay with the snails, or in an escargot dish with individual wells for each snail. If they tip over too much, consider laying down a thin layer of rock salt to nestle them in so they stay steady.
- Peel and mince the garlic and shallot. Mince the parsley. In a small bowl, mash the butter with the garlic, shallot, and parsley to form as smooth a paste as you can (you can also do this in a food processor if you have a mini one). Add salt and pepper to taste (the amount of salt will depend on the salt level of your butter).
- Put a small amount of the butter in each shell, stuff in a snail, and top it all off with as much butter as you can stuff in the shell. Rearrange the shells as needed to keep them steady, and bake until the butter is melted and the snails are tender, about 15 minutes.
Notes
More From This Issue
Party Like It’s 1927
Magic descends on Reno’s Idlewild Park, especially on summer nights. It’s lit by the diverse vendors at Food Truck Fridays,…